Notifications are the new way to send and receive information from a website. Instead of getting the info in your mailbox as a subscription, you can avail better than that. The one direct benefit is that you will get the access to those informative contents from the website without even logging into your mail account. This consumes a lot of time when you don’t have to check for those subscription emails from the site. But in the case of the notification, you will get all of it whenever you turn your browser On. Most of us use Chrome browser which is so easy to configure and has way more option than a normal browser.
If you are a kind of person who does surfing the internet. Due to this habit of generally surfing the internet, you may find more than one site for any particular query of you. Since you are looking to get the info somehow that time you will hit the allow button of notification even when you don’t want notification of that site at all. This situation can happen when you are in a rush of finding something on the internet.
Here is how you can turn off chrome notification on windows 10, 8, 7 or for others:
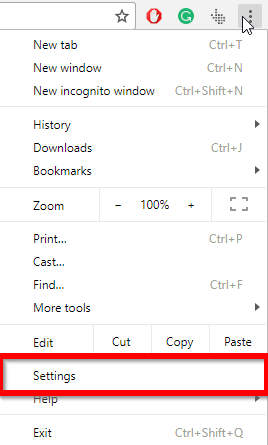
- Open your chrome browser, select the chrome menu icon which is located on the top tight on the chrome window.
- Now from the list select the Settings option.
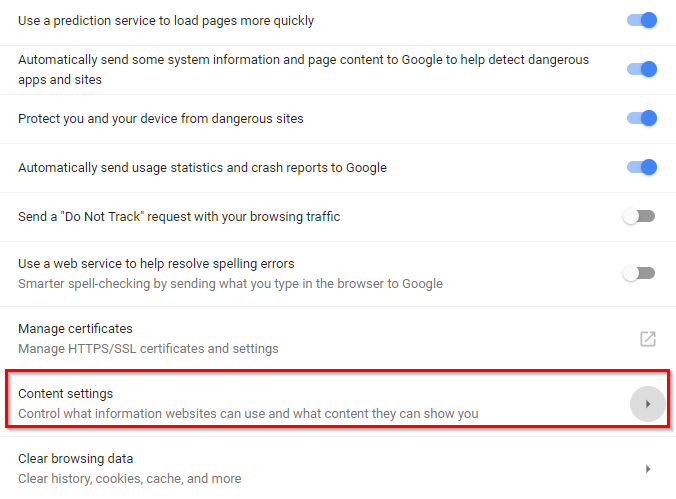
- On the Settings page, scroll down and select the Advanced option. Now under the Privacy and Security section, you have to select the Content Settings option.
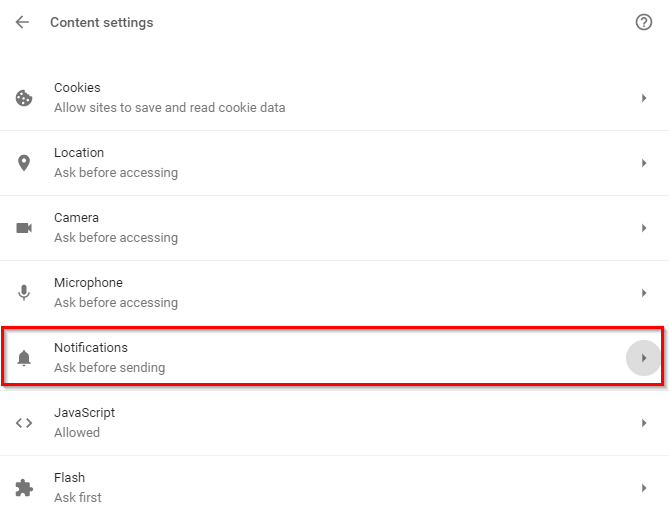
- On the Content Settings window, choose Notifications option.
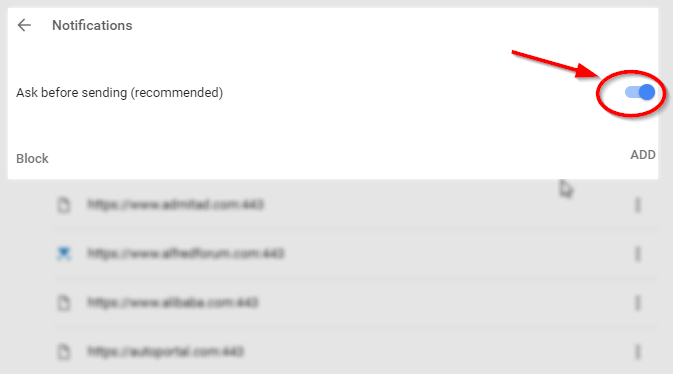
- On the next window/notification setting page, you will see an enabled icon option. Click that and make the option disabled.
,
- Once you have done disabling the Notifications button then you will never receive any content through notification push-ups from any site that you have subscribed to those notifications.
You maybe have accidentally press the block button on few informative sites on that rush time. And in order to Allow those sites to send you notification again, you need to set them to Allow. To Check those domains in which you have blocked the notification and make them allow again or to check blocked sites, you have to follow above given 5 steps. After following the above 5 steps, you will be on the Notifications Settings window. Here you will see the list of domains you have blocked for notification.
If you want to enable any of the specific, then choose that one and click the 3 dots icon given in front of them.
those three dots will give you three options. Choose Allow and you are done!. This is the easiest way in which you can do it. All you have to do is go through above steps and it will work for you as well.


 ,
,