There are various brands of laptops which people use. On those various brands, Toshiba laptops are one of the most affordable ones. Without digging into more about its features and functionalities, let’s get to the point directly. Since taking screenshots is one of the best ways to gather and store a piece of content/information so people do use it oftenly. Similarly, Toshiba laptop user should know how to screenshot on Toshiba laptop. So here are two ways by which you can perform this task. The Given methods are only valid for windows users.
By Using Short Keys
Performing a task in windows by using short keys is probably the best and fastest way to get your task done. Instead of looking for particular options in GUI, for some most usable and popular tasks you have short keys. Even you can access the MS word and perform the task in MS word using short keys. So when it comes to taking a screenshot on Toshiba laptop and you have windows installed then you have this option again. You can take a screenshot using these short keys:
Windows+PrtScr: Press Windows key and Print key simultaneously and it will save the entire windows screen to screenshot folder which is located in your primary drive.
PrtScr: Hit print key(PrtScr) and it will take the screenshot of your entire window screen but this time you can’t see it on screenshot folder or it will not be saved. In order to save the screenshot, you need to paste it any image editor tool and from there you can save it. Or you can use Ms word or any other MS office tool to paste the screenshot and save it from there.
Alt+PrtScr: Pressing Alt and PrtScr keys simultaneously will take the screenshot of the current window instead of taking the screenshot of entire windows screen. To see or Save the screenshot you need to paste it using any image editor and save the screenshot from there.
By Using Snipping Tool
The best part of using Windows OS that it makes the task way easier in GUI by providing you tools for most of the popular tasks. For Screenshot, it also has a preinstalled tool known as Snipping tool.
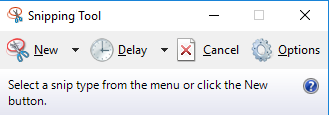
So in order to take the screenshot, you need open search bar on your windows system, especially when you using windows 8 or 10. It makes searching files and applications way too easy. Search the keyword “Snipping Tool” and open the Snipping Tool.
Instead of taking a screenshot of entire windows screen or particular window screen, here you can take the screenshot of the separate part of any window. All you need to do is click on New on snipping tool and snip the part of windows that you wanted to save.
There are several other snipping tool alernative that you can try for better editing afterward the screenshot is done. Although for basic screenshot taking these above given options are the best one.